0%

我们可能会在特定情况下,需要将公司 Git 版本库进行迁移。 这里不讨论公司的 Git 服务器是gitlab 、gitblit 或是balabala……

不同框架有不同的迁移方式。您可能有更好的迁移版本库的方法,这里只是提供一总迁移的方法,不用折腾,简单,也是最笨的方法。

这种迁移方式是跨平台的

前言

本文举例围绕将 http://192.168.0.1/project_a.git 迁移至 http://192.168.0.2/projcet_a_new.git 上。 实际操作中请替换为您的服务器地址及项目名称

Let`s Go

  1. 本地新建文件夹server_code (名称任意, 主要用来clone 服务器代码到本地

  2. server_code 中 clone project_a

    1
    2
    3
    # 请用命令行操作
    git clone --bare http://192.168.0.1/project_a.git
    # 注意,下载后的文件夹是 `project_a.git` 文件夹
  3. 新 Git 服务器,新建同名或不同名的项目。并复制地址

    本示例为:http://192.168.0.2/project_a_new.git

  4. 命令行 CD 进入 project_a.git 目录

    1
    2
    3
    4
    5
    $ pwd
    $ /Users/alexliu/tmp/server_code
    $ cd project_a.git
    $ pwd
    $ /Users/alexliu/tmp/server_code/project_a.git
  5. 推送项目

    1
    2
    # 推送
    git push --mirror http://192.168.0.2/project_a_new.git

OK, 这样项目所有的提交记录、分支、tags、release 版本都提交了到新的版本库了
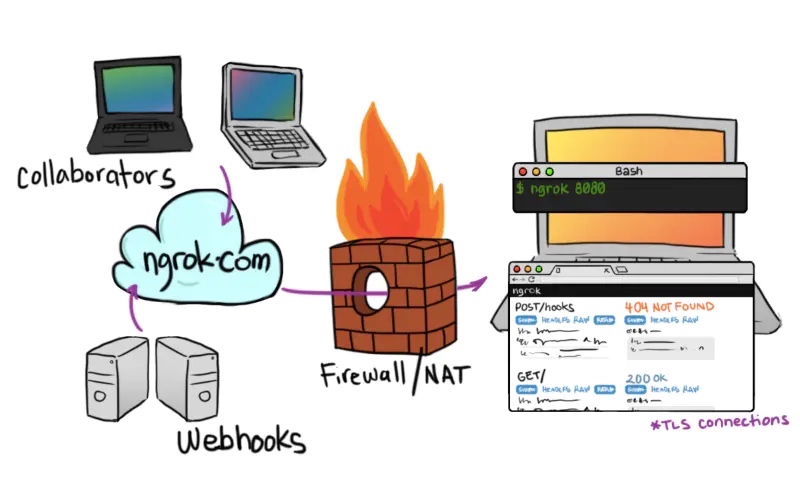
ngrok 是一个反向代理,通过在公共的端点和本地运行的 Web 服务器之间建立一个安全的通道。ngrok 可捕获和分析所有通道上的流量,便于后期分析和重放。反向代理在计算机网络中是代理服务器的一种。

阅读全文 »

python 爬虫中,必然会接触到 HTML 解析。 lxml是一个Python库,使用它可以轻松处理XML和HTML文件,还可以用于web爬取。市面上有很多现成的XML解析器,但是为了获得更好的结果,开发人员有时更愿意编写自己的XML和HTML解析器。这时lxml库就派上用场了。这个库的主要优点是易于使用,在解析大型文档时速度非常快,归档的也非常好,并且提供了简单的转换方法来将数据转换为Python数据类型,从而使文件操作更容易。

阅读全文 »

防火墙相关

开放/关闭端口

1
2
firewall-cmd --zone=public --add-port=443/tcp --permanent       # 开放443端口
firewall-cmd --zone=public --remove-port=443/tcp --permanent # 关闭443端口

查看防火墙所有开放的端口

1
firewall-cmd --zone=public --list-ports

防火墙重新加载

任何修改了防火墙相关的配置,都需要重启防火墙,使之生效

1
firewall-cmd --reload 

关闭防火墙

如果要开放的端口太多,嫌麻烦,可以关闭防火墙,安全性自行评估

1
systemctl stop firewalld.service

查看防火墙状态

1
firewall-cmd --state

端口

查看监听的端口

centos7 默认没有 netstat 命令,需要安装 ‘net-tools’ 工具,yum install -y net-tools

1
netstat -lnpt

示例

1
2
3
4
5
6
7
8
9
10
11
12
13
14
15
16
17
18
19
[root@centos7-alexliu ~]# netstat -lnpt
Active Internet connections (only servers)
Proto Recv-Q Send-Q Local Address Foreign Address State PID/Program name
tcp 0 0 127.0.0.1:4040 0.0.0.0:* LISTEN 67591/ngrok
tcp 0 0 0.0.0.0:80 0.0.0.0:* LISTEN 70689/nginx: master
tcp 0 0 192.168.122.1:53 0.0.0.0:* LISTEN 2474/dnsmasq
tcp 0 0 0.0.0.0:22 0.0.0.0:* LISTEN 1091/sshd
tcp 0 0 127.0.0.1:631 0.0.0.0:* LISTEN 1087/cupsd
tcp 0 0 127.0.0.1:25 0.0.0.0:* LISTEN 1718/master
tcp6 0 0 :::2017 :::* LISTEN 98919/v2raya
tcp6 0 0 :::9000 :::* LISTEN 99517/docker-proxy-
tcp6 0 0 :::20170 :::* LISTEN 65216/v2ray
tcp6 0 0 :::20171 :::* LISTEN 65216/v2ray
tcp6 0 0 :::20172 :::* LISTEN 65216/v2ray
tcp6 0 0 :::22 :::* LISTEN 1091/sshd
tcp6 0 0 ::1:631 :::* LISTEN 1087/cupsd
tcp6 0 0 :::32345 :::* LISTEN 65216/v2ray
tcp6 0 0 ::1:25 :::* LISTEN 1718/master

检查端口被哪个进程占用

1
netstat -lnpt |grep 80

示例

1
2
[root@centos7-alexliu ~]# netstat -lnpt |grep 80
tcp 0 0 0.0.0.0:80 0.0.0.0:* LISTEN 70689/nginx: master

查看进程的详细信息

1
ps 70689

示例

1
2
3
[root@centos7-alexliu ~]# ps 70689
PID TTY STAT TIME COMMAND
70689 ? Ss 0:00 nginx: master process /usr/local/nginx/sbin/nginx -c /usr/local/nginx/conf/nginx.conf

中止进程

1
2
3
kill 70689
# 强制 kill
kill -9 70689

安装

1
2
3
4
5
6
7
8
9
# 安装方式一: yum 直接安装
# 建议先用 yum search 查看你的 yum 源下是否是 13
yum -y install postgresql-server

# 安装方式二: 安装官方 yum 源再安装 postgresql

yum install -y https://download.postgresql.org/pub/repos/yum/reporpms/EL-7-x86_64/pgdg-redhat-repo-latest.noarch.rpm

yum install -y postgresql13-server

初始化

1
2
# 不初始化没有配置文件数据等  或者 /usr/pgsql-13/bin/postgresql-13-setup initdb
postgresql-setup initdb

修改配置

修改密码

安装 postgresql 后,会创建 postgres 用户

1
2
3
4
5
6
7
8
# 切换用户
su -postgres

# 切换成功后. 可以看到命令行变为

[root@alexliu ~]# su - postgres
上一次登录:三 12月 9 11:11:56 CST 2020pts/0 上
-bash-4.2$
1
2
3
4
5
6
7
8
9
10
# 打开 postgresql

psql -U postgres

# 成功后
-bash-4.2$ psql -U postgres
psql (9.2.24)
输入 "help" 来获取帮助信息.

postgres=#
1
2
# 修改密码, 密码内容自定义 , 注意语句结束需要加上 `;`
ALTER USER postgres with encrypted password 'abc123';
1
2
3
# 修改完成后 
\q # 退出 postgresql
exit # 退出 postgresql 后输入 exit 返回 root 用户

获取配置目录

1
2
3
4
5
6
7
8
9
10
11
12
13
14
15
16
17
18
# 切换用户
su -postgres
# 打开 postgresql
psql


# 查询config_file
postgres=# show config_file;
config_file
-------------------------------------
/data/pgsql/13/data/postgresql.conf

# 查询当前数据目录
postgres=# show data_directory;
data_directory
---------------------
/data/pgsql/13/data

允许远程登陆

1
2
3
4
5
6
7
8
9
vi /var/lib/pgsql/13/data/postgresql.conf

# 打开配置后
:set number # 开启行号显示

# 把第 59 行的 监听地址 改为 * . 默认是注释掉的
59 listen_addresses = '*' # what IP address(es) to listen on;
60 # comma-separated list of addresses;
61 # defaults to 'localhost'; use '*' for all
1
2
3
4
5
6
7
8
9
10
11
12
13
14
15
16
17
18
19
20
21
22
vi /var/lib/pgsql/13/data/pg_hba.conf

# 打开配置后, 找到如下配置(最后面)


# TYPE DATABASE USER ADDRESS METHOD
# "local" is for Unix domain socket connections only
local all all peer
# IPv4 local connections:
host all all 127.0.0.1/32 ident
# IPv6 local connections:
host all all ::1/128 ident
# Allow replication connections from localhost, by a user with the
# replication privilege.
#local replication postgres peer
#host replication postgres 127.0.0.1/32 ident
#host replication postgres ::1/128 ident


# 添加如下内容在最后
host all all 0.0.0.0/0 md5

系统配置

启动\停止\开机启动

1
2
3
4
5
6
7
8
9
10
# 启动
systemctl start postgresql
# 停止
systemctl start postgresql
# 状态
systemctl status postgresql
# 重启
systemctl restart postgresql
# 开机启动
systemctl enable postgresql

防火墙配置

1
2
3
4
5
6
firewall-cmd --add-service=postgresql --permanent
firewall-cmd --zone=public --add-port=5432/tcp --permanent # 5432为postgresql端口
firewall-cmd --reload

# 查看防火墙开放端口
firewall-cmd --zone=public --list-ports

Sitemap 可方便网站管理员通知搜索引擎他们网站上有哪些可供抓取的网页。最简单的 Sitemap 形式,就是XML 文件,在其中列出网站中的网址以及关于每个网址的其他元数据(上次更新的时间、更改的频率以及相对于网站上其他网址的重要程度为何等),以便搜索引擎可以更加智能地抓取网站。

阅读全文 »

最近SS、SSR 老是被 ban,只有换工具了,一直听说 v2Ray 很好用。就尝试切换到 v2Ray 。网上看了下现有的教程,大多是 nginx 的,这里有几个问题。

  1. 大多数教程是裸搭建,仅适合为了 v2ray 买个 vps 来搭建的人
  2. 大多已经不适用现在的版本
  3. 客户端多数是 v2RayN 、V2RayW (windows),而非 MacOS 的

因为我个人的 VPS,就一个 blog 和一些自己的测试应用,都是 apache,而且中间有大量的配置。实在懒得为了个 v2Ray 搭一套 Nginx 的环境了。所以就在现有的环境下搞了。

阅读全文 »

Homebrew 在国内的更新速度实在感人,几十 kb 的东西,盯着进度条能把人搞崩溃。虽然换国内的源不一定就能解决问题,但是换了还是比不换好。下面来介绍如何换换国内的源,不换国内源也能下载快的偏方。望能帮助到大家。

阅读全文 »

现在听个音乐太难了,各大播放器在版权争夺下搞得一个音乐市场乌烟瘴气。有些歌这个平台可以听有些歌那个平台可以听。想听全就都买 VIP。懒得折腾了,还是回到起点吧”==下载音乐==”。因为主要上下班开车听听歌,发现下载下来的音乐很多都没有 id3 信息,网上找一些编辑 ID3 信息的编辑后,还是乱码。原因是现在基本都是 ID3 V2 信息了,没有写入 ID3 V1 信息。那么一些老款车或者中控都不支持 ID3 V2(比如我的车时 2012 款),就会显示乱码。就想用 python 随便写一个来用用

阅读全文 »